Begin your work by creating a new file (File>New) with 1600x1200 px and 72 dpi. Using the Paint Bucket Tool (G), fill the new file with the color #A666B2

Find in Internet a pattern like this one and open it in Adobe Photoshop program.
Edit>Define Pattern
Next select the Rectangle Tool (U) to continue representing the background of our picture.

Select next parameters for the last layer by making a mouse click on the layer we work with on the layers' panel: Blending Options>Pattern Overlay


Select again the Rectangle Tool (U) to dark out the edges of our picture.

The layer's parameters: Fill 0%
Blending Options>Gradient Overlay

Gradient's parameters:


Using the Rectangle Tool (U), it's possible to draw on this stage a kind of flatness.

The layer's parameters: Fill 0%
Blending Options>Outer Glow

Blending Options>Gradient Overlay

Gradient's parameters:

Blending Options>Stroke


Now we should create a new file (File>New) with 1600x1200 px and 72 dpi.
Then fill it with the white color, applying the Paint Bucket Tool (G), choosing also this filter's option: Filter>Noise>Add Noise


Set for this layer also the next selection: Filter>Blur>Motion Blur


Edit>Define Pattern
Take again the Rectangle Tool (U) to represent the basic element of the logotype to be. Firstly we'll create the primary common layer and then press Alt button when applying the mentioned tool to cut out the inside part. Choose after that the Convert Point Tool to make the appropriate corrections of the made opening, like it is demonstrated on the next image:


The layer's parameters: Blending mode-Darken
Blending Options>Inner Glow

Blending Options>Bevel and Emboss

Blending Options>Bevel and Emboss (Texture) it's time to apply the pattern we have chosen for it the filters, like Add Noise and Motion Blur

Blending Options>Satin

Blending Options>Gradient Overlay

Gradient's parameters:


Now we should write the logotype's title:


Select the same parameters for the text that we had applied for the basic layer of the logotype. It's necessary in this case to press the right mouse's button on the layer containing the basic elements of the logotype and select this option - Copy layer style. On the text's layer press the right mouse's button and choose this option - Paste layer style

Try to represent now the text in a more evident form. In this case we should hold Ctrl button when making a mouse click on the text's layer on the layers' panel:

Next mark out the layer containing the logotype's basis, make a mouse click on the bottom part of the layers' panel on Add a Mask option and press this combination of buttons – Ctrl+I. We'll see the Adobe inscription cut on the logotype's basis.

Next try to mark out the text's layer. Make a mouse click on the same layer on the layer's panel, choosing Add a Mask selection. After that we should apply the Brush Tool (B) of black color to clean out the Adobe word.


Write the word JOIN above the logotype, keeping the demands inserted in the next table:


The layer's parameters: Blending Options>Bevel and Emboss

Blending Options>Gradient Overlay

Gradient's parameters:


Create a new layer.
This time select the Elliptical Marquee Tool (M) to mark out the zone under the logotype and choose the Paint Bucket Tool (G) to paint this zone in white color. This layer must be placed lower than logotype's layers (on the layers' panel).

Select for this layer this solution: Filter>Blur>Gaussian Blur


Using the Eraser Tool (E), it's possible to delete that part of the layer the logotype is kept in.

Set the next parameters for the same layer: Blending mode-Overlay

Create a new layer and use on it the Rectangular Marquee Tool (M) to mark out the zone under the logotype and after that choose the Paint Bucket Tool (G) to fill this zone with white color:

Select Free Transform solution to stretch out the lowest edge and compress a little the laying, the same way shown below:

Set on the same layer the next option: Filter>Blur>Radial Blur


…and Filter>Blur>Gaussian Blur


Choose once again the Eraser Tool (E) on this layer to clean out the shown below logotype's zone, setting the next layer's parameters: Blending mode-Overlay

Create a new layer and use on it the Brush Tool (B) of white color for drawing the shadow under the logotype. This layer must be situated lower than all other logotype's layers (on the layers' panel).

Set the next parameters for the layer: Blending mode-Soft Light

Select again the already known Brush Tool (B) of black color (Opacity 30%) to dark out the zone under the word TUTORIALZ. Place the layer with the shadow lower than all other logotype's layers (on the layers' panel):

Set the next parameters for the layer: Blending mode-Soft Light


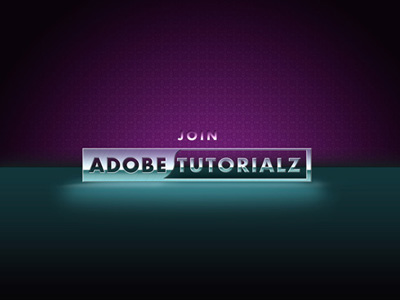
Finished!
Source
1 comment:
Very nice post here.
Post a Comment